Friday, March 6, 2020

~ La-La Land Crafts - Make a Wish ~

 Happy Friday everyone and welcome!

Today's Inspiration Friday challenge over at La-La Land Crafts is SPRING.  Spring is my favorite time of year.  It is a time of renewal; a chance to bloom and grow.


For my project today, I chose to use Simple Moments Marci.  Not only is she downright adorable but her name says it all.  It is the simple moments in life that are truly important.  We need to cherish and tuck those moments away in our hearts to remember forever!


I created the pattern on Marci's sundress by first inking up the daisy background stamp from the Oopsie Daisy Background Stamp Set using my stamp press and a Memento Dandelion Ink Pad.  How poetic is that?! LOL  To give the daisies a deeper richer color, I used the tip of my Memento Cantaloupe Ink Pad to dab color onto the stamp in random places and stamped over the flowers.  Using the stamp press makes it so much easier to get perfect ink placement.

 I added white gel pen to highlight the centers and petals of the flowers.  I also added some random white dots to make the fabric of her dress even cuter.  I cut out her dress and paper pieced it onto my image after color her skin and hat.  Having decided to paper piece her dress meant I also had to color and fussy cut her hair and paper piece it onto my image.  If you did not want to paper piece, you could choose to mask off the parts of the image you did not want to get the daisies on, however, I like the dimension that paper piecing adds to my projects even though it is a little extra work.


You know the saying, Spring Showers Bring May Flowers plus a whole lot of mushrooms and weeds...I mean Dandelions...lol  I turned the twig from the Stump With Twig Die Set into blooming Dandelions.  I added multi-fine iridescent glitter to create the Dandelion puffs.  Didn't you just love blowing the puffs into the wind and making wishes when you were a child?  I know I surely did!  Such beautiful and whimsical childhood memories.


"SPRING:  a lovely reminder of how beautiful change can truly be."


Simple Moments Marci Rubber Stamp

Garden Gate Die

~ Copics ~
Eyes - B91 B93 B95
Hair - E42 E57 E55 E99 E13 E53
Skin - E0000 E000 E00 E50 E51 E11/E93 R20 R30/E04
Hat - Y13 Y15 Y18 Y19 YR23 YR24 YR27
Dress - Y00 Y11 Y13 Y15 Y18 Y19 YR23 YR24 
Dandelions - Y11 Y13 Y15 Y19 Y17
Greens - FYG1 YG21 YG03 YG17 YG23 YG25 YG67
Mushrooms - R32 R24 R27 R29/T2 T3 T5 T7
Tree Trunk - E35 E37 E39 E49
Cast Shadow - BV20
Blending Solution/Burlap and Terry Cloth

~ Misc. ~
Silver Rhinestones
White Gelly Roll Pen #10
Multi Ultra Fine Iridescent Crystal Glitter
Dandelion Memento Ink Pad
Cantaloupe Dew Drop Ink Pad
Broken China Distress Ink Pad

**I participate in La-La Land Craft's affiliate program.  That means I receive a commission when products are purchased through links here on my blog. (At NO additional cost to you).  This allows me to be able to make more projects to share and hopefully inspire you!  From the bottom of my heart, I appreciate your support!!!

Happy Stamping!

~ Nicolette ~


Thursday, February 27, 2020

~ La-La Land Crafts - let's Rock-n-Roll Pop-up Card Tutorial ~


Hi everyone!

Today I am sharing with you a fun pop-up card tutorial.  Now I know this idea has been around forever, however, in all my years of crafting, I have never made one these before.  Shocker, I know...right?!  So I thought, if I haven't made one, surely someone else hasn't ever made one and would like to know how, too!


My idea all started with the rockin' Hippos in the new Rock On! Clear Stamp Set and the awesome new musical dies that La-La Land Crafts just released.  I thought how fun it would be to create a stage on the inside of the card and when you opened it up the hippos would pop up as if they were performing their latest hits.


Ta-dah!  Squeeeeeee...how stinkin' cute did my idea turn out?!!!  I seriously couldn't be any happier if I tried!  I chose the blue dotted designer paper from the Blue Christmas Designer Paper Pack for the background as I thought it look liked an actual stage backdrop with stage lighting shining on it.  I really love the effect the paper adds to the design.


To make the words, Rock Star, stand out, I used three different colors of cardstock and offset them from each other to give off that 3-D effect.  Plus, I used my handy dandy tweezers and precision point glue pen and popped the itsy-bitsy teeny-tiny yellow dots into the black Rock Star die cut.  I love how "Rock Star" looks like it is actually lit up with lights.


I, of course, had to add a shaker element to the front of my card.  I offset the stars and added in some yellow, black and iridescent white sequins for some extra birthday fun.

Now let's get down to the fun!

This is a regular A2 sized card with a card base measuring at 8 1/2" x 5 1/2".

Step 1


Using the new checkered stencil from the Everything Is Rosy Layering Stencil Set, emboss a
 4 7/8" x 3 5/8" piece of white cardstock.  I used a pieces of low tack tape to keep my stencil in place.

Step2


After embossing, leave stencil on cardstock and sponge Dandelion and Cantaloupe Memento Ink through the stencil.  Set aside.

Step 3


For steps 3, 4, 5 and 6 I am using a piece of white paper to demonstrate what you would do to a black piece of cardstock so you can see it better.  First, cut a piece of black cardstock to 8 1/4" x 5 3/8" and score at 4 1/8".  Fold in half with the right side of cardstock on the inside.

Step 4


At the fold, (this should be the wrong side of your cardstock) measure like I have done above and cut as shown.  Do NOT cut tabs off.  Fold tabs as shown to create a crease.

Step 5


Turn cardstock over and fold tabs in the other direction to create another crease.  Lay tabs back down.

Step 6


Open card up and carefully invert tabs to the inside of the card.  Close and re-open the card so the inverted tabs will get a good crease in the correct direction and will pop up when the card is opened.

Step7

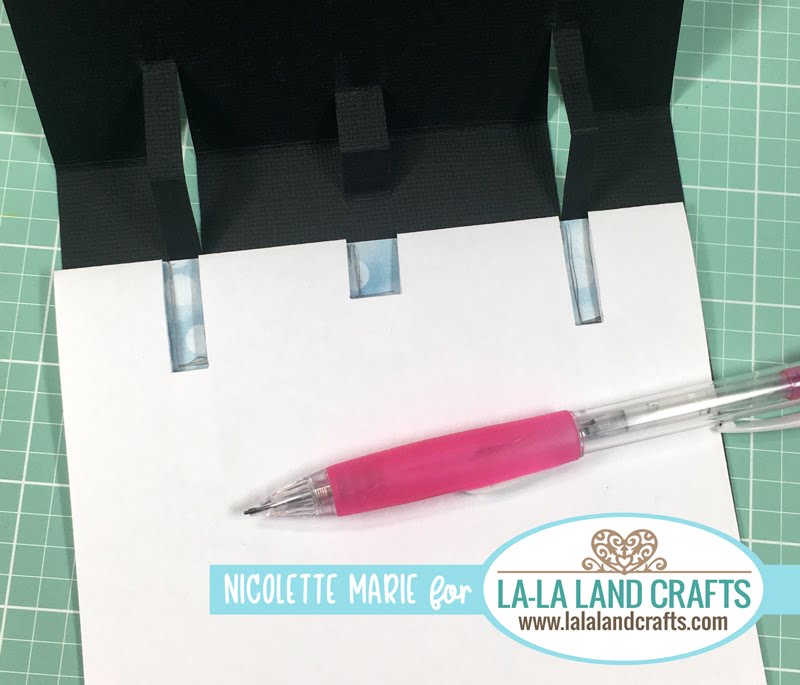
Die cut a white piece of cardstock using the largest Scalloped Rectangles Die.  Cut a piece of designer paper to 4 7/8" x 3 5/8" and adhere to white scalloped die cut.  Lay this piece on top of black cardstock as shown above.  With a pencil, lightly mark where the tabs will go. 

Step 8

Cut away this portion of the paper slightly wider than the actual tabs.  I used a white piece of paper so you had a visual.

Step 9

Now you can slide this piece in and adhere to card.

Step 10


You will repeat the same steps as you did in Steps 7, 8 and 9 for the floor of the stage except you will use the stenciled piece of cardstock you made in Step 1 and you will leave the tabs attached instead of cutting them off.  *See Step 12.

Step 11


Step 12


This is how I left the tabs.  You can cut them off, however I wanted the hippos to look like they were standing on the continuation of the stage instead of having black tabs behind them.  It's totally your preference.  Adhere this piece to the card.


This is how your stage should look so far.

Step 13


Die cut two sets of curtains using the Stage Curtain Die Set out of white cardstock.  Adhere sides of curtains to card using different levels of dimensional foam tape.  Offset valences together using glue pen.  Adhere to card using a double layer of dimensional foam tape.  I added yellow star diecuts to the valence using the star from the Rock Star Die.

Step 15
Extra Reinforcement Hinge

I needed to create an extra reinforcement hinge to put behind the drumming hippo.  Because I wanted him to sit behind the other hippos, my tab only came out 1/2".  The tab was not tall enough to withhold the size of the image so I created an extra hinge out of a scrap piece of black cardstock and attached it using glue dots.  You can see how it looks in the photo below.


Step 16

Adhere your hippos to the pop-up tabs using strong tape or glue dots.  Fold the card closed so they get adhered really well to the tabs.  Now you can decorate your card any way you would like.  
ROCK ON and HAVE FUN!


I stamped and cut out the sentiment.  I adhered the sentiment to the the smaller Folding Banners Die using dimensional foam tape.

I HOPE YOU ENJOYED MY TUTORIAL!


Rock On! Clear Stamp Set

Everything is Rosy Layering Stencil

Love You More Paper Pack

Christmas Hodgepodge Paper Pack

Blue Christmas Paper Pack

Scalloped Rectangles Die

Double Stitched Stars Die

Music Notes Border Die

Stage Curtain Die

Treble Clef Die

Rock Star Die*

~ Copics ~
Hippos - C00 N1 N2 N3 N4/R0000 R000 R00
Yellows - Y11 Y13 Y15 Y18 Y19
Reds - R32 R24 R27 R29 R89
Grays - C0 C1 C3 C6 C7
Browns - E30 E31 E33
Blending Solution/Texture Rag

~ Misc. ~
Acetate
Sequins
Red Rhinestones
Silver Rhinestones
White Gelly Roll Pen #10
Dandelion Memento Ink Pad
Cantaloupe Memento Ink Pad

**I participate in La-La Land Craft's affiliate program.  That means I receive a commission when products are purchased through links here on my blog. (At NO additional cost to you).  This allows me to be able to make more projects to share and hopefully inspire you!  From the bottom of my heart, I appreciate your support!!!

Happy Stamping!

~ Nicolette ~

Related Posts Plugin for WordPress, Blogger...