Friday, May 29, 2020

~ my Hero - La-La Land Crafts ~

Hello!

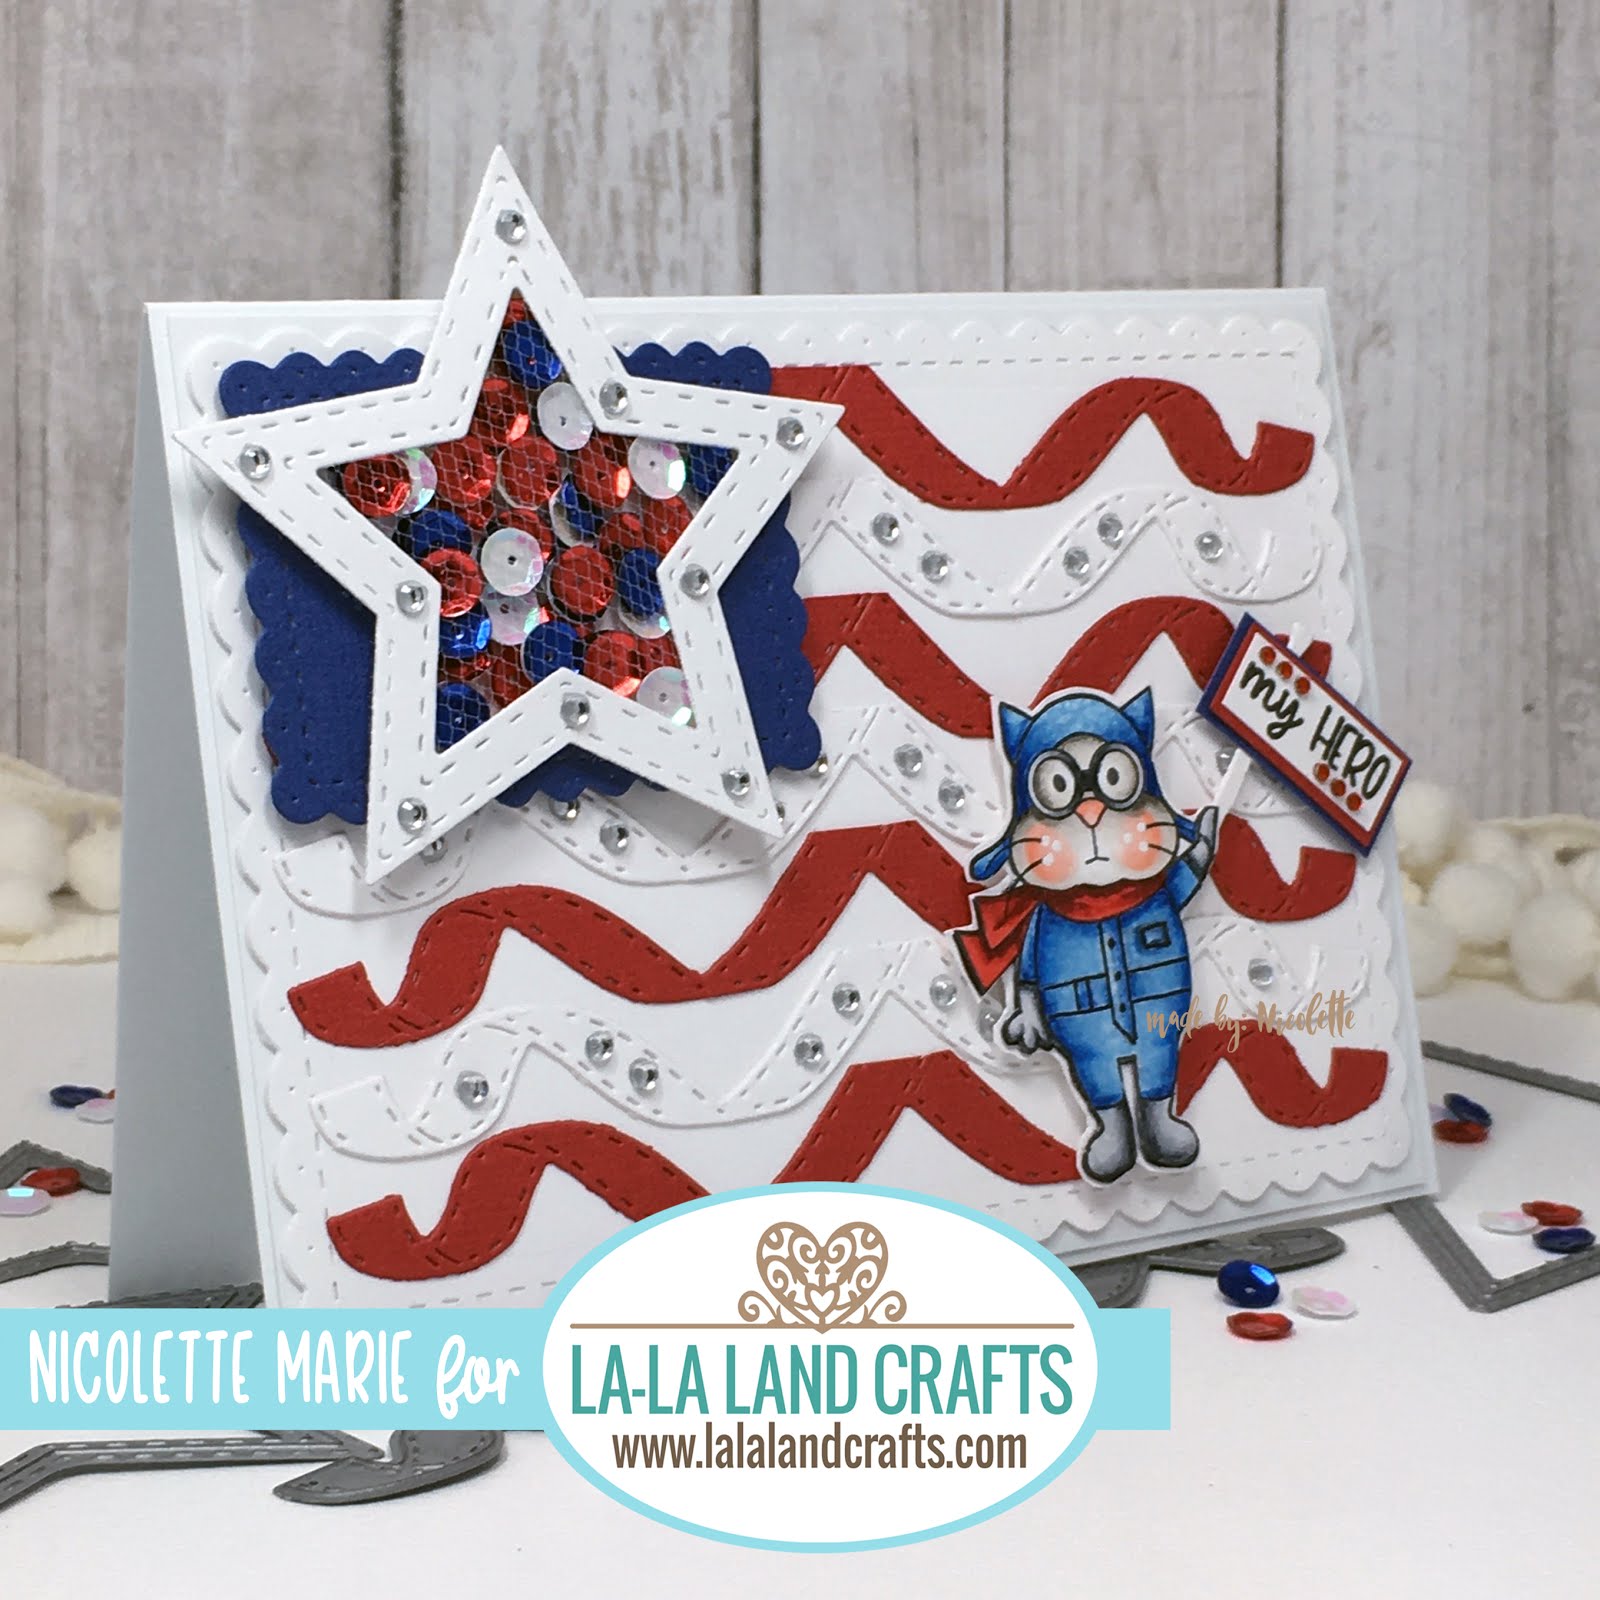
It's Friday and time for another Inspiration Friday challenge post.  This week's theme over at La-La Land Crafts is ANYTHING GOES.  Since Monday was Memorial Day here in the United States, I decided to make a card honoring all of those who have lost their lives serving in the military protecting us and our freedom and their families who have suffered the ultimate sacrifice.  They are true Heroes!


To make the stripes on the flag, I used the new Awareness Ribbon Die and trimmed off the loop on each stripe.  I added rhinestones to the white stripes to give them some highlights.  I tried adding red rhinestones to the red stripes but thought it looked too cluttered. 


I used the pilot kitty from the Traveling Cats Clear Stamp Set for my Air Force Pilot Kitty.  As a child, my dad was a Captain in the Air Force, so the flight suit I designed is to honor his service.  When I went to visit my dad on the base, he was usually in this style of uniform, of course, his was green instead of blue.  I took creative license and changed the color for my card today.  I drew in the flight suit details using my Copic Multiliner 0.3 Pen.  The original kitty image was holding a little airplane but I cut if off so my kitty could wave a flag saying "my Hero."


I used the Double Stitched Stars Die Set to create the star shaker.  I used tulle instead of acetate for the shaker window.  I really love how the tulle looks over acetate on this card.  I filled it with yummy red, white and blue sequins and added rhinestones around the star for extra sparkle and to continue the design element from the rhinestones on the stripes.


This card would be great to send to someone who has served or is serving in the military thanking them for their service.  You could, of course, color the uniform to fit any of the military branches...Army, Navy, Air Force...Marines!

~ La-La Land Crafts ~

Scalloped Rectangles Die

Double Stitched Stars Die

Awareness Ribbon Die

~ Copics ~

Cat Fur - W00 W0 W1 W3 W5/R000 R00 R01 R02
Uniform - B21 B23 B24 B26 B18
Scarf - R32 R24 R27 R29 R89
Boots/Glasses - C0 C1 C3 C5 C7
Multiliner 0.3

~ Misc. ~
Red, White & Blue Sequins
White Gelly Roll Pen #10
Silver Rhinestones
White Tulle

**I participate in La-La Land Craft's affiliate program.  That means I receive a commission when products are purchased through links here on my blog. (At NO additional cost to you).  This allows me to be able to make more projects to share and hopefully inspire you!  From the bottom of my heart, I appreciate your support!!!

Happy Stamping!

~ Nicolette ~

Thursday, May 21, 2020

~ Get Well Soon Pocket Tissue Holder Tutorial - La-La Land Crafts ~


Happy Thursday Everyone!

Today I am so excited to share with you a tutorial on how to create a cute little pocket tissue holder featuring the adorable Cured Yet? Clear Stamp Set from La-La Land Crafts.  This was so much fun to create and it is sure to bring a smile to anyone's face and make them feel better just looking at it sitting next to them when they have the sniffles.


~ Step-by-Step Instructions ~

Step 1 
Trim white cardstock to 11" x 4 1/4"

Step 2
Score on the long side at 1/2", 3", 4", and 6 1/2"
Fold on scored lines.


Step 3
Using smallest Double Stitched Oval Die, trace in the center of the 4 1/4" x 2 1/2" panel where the tissue paper opening will be.  Adhere the die on top of the trace marks using low-tack tape and die cut opening.


Step 4
Cut white cardstock to the following measurements:
4 1/8" x 3 3/8"
4 1/8" x 2 3/8"
4 1/8" x 7/8"

Cut designer paper to the following measurements:
(I used paper from the Spring Has Sprung Paper Pack)
4" x 3 1/4"
4" x 2 1/4"
4" x 3/4"


Step 5
Using smallest Double Stitched Oval Die, trace in the center of the white 4 1/8" x 2 3/8" panel and the designer paper 4" x 2 1/4" panel.  Die cut openings using method in Step 3.


Step 6
Adhere matching designer paper panels to white cardstock panels.  Adhere to tissue paper holder.


Step 7
Diecut white cardstock using second smallest Pierced Scalloped Oval Die and smallest Double Stitched Oval Die to create a frame for the tissue opening.  Adhere to tissue holder.  See photo in step 8.


Step 8
Using strong adhesive on the 1/2" flap, line up the tissue pack and secure the flap in place to the back of the holder.  The tissues will be able to slide in and out of either end.


Step 9
Diecut designer paper using the largest Stitched Nested Circles Die.
Diecut white cardstock using the Mandala Doily Die.
Adhere together.


Step 10
Diecut white cardstock using the largest and second largest Stitched Nested Circles Dies to create a circle frame.  Adhere to Mandala Doily diecut.  Adhere to back panel of tissue holder.


Step 11
Diecut white cardstock using Doily String Border Die.  Trim to fit and adhere to front panel of tissue holder.


Step  12
Stamp, color, trim around image.  Add red rhinestone to end of thermometer.  Adhere to center of Mandala Doily diecut using foam tape.


~ Copic Colors Used ~
Pig - R0000 R000 R00 R01 R02
Hoof - W0 W1 W3 W5
Bed Frame - E30 E33 E35 E37
Sheet - C00 C1/RV0000
Blanket & Pillow -  BG10 BG11 BG13
Tissue Box & Compress - Y11 Y15 Y18 Y19
Tissue - C00 C1/0 Blender
Thermometer - R24 R29/W1

Step 13
Diecut two pieces of designer paper and two pieces of white cardstock using Get Well Soon Die.  *You will need two sets of words in each paper in order to cut out all three words completely.  Cut words apart.  Glue together slightly offset using a glue pen.  Adhere to top of white circle frame.


Step 14
Diecut a piece of designer paper using the bottle portion of the Pill Bottle Die Set.  Die cut white cardstock using the cap and heart label portion of the Pill Bottle Die Set.  Glue cap to pill bottle.  Adhere a piece of acetate to back of heart label.  Adhere foam tape to back of heart label to create room for shaker bits.  Add a few heart shaped baking bits to center of pill bottle diecut and adhere heart label over top of baking bits to create shaker.  Adhere to tissue holder using foam tape.


Step 15
Decorate with pink rhinestones.


Here is your finished pocket tissue holder!


I hope you enjoyed my tutorial today!

~ La-La Land Crafts ~

Cured Yet Clear Stamp Set

Spring has Sprung Paper Pack

Stitched Nested Circles Die

Pierced Scalloped Ovals Die

Double Stitched Ovals Die

Doily String Border Die

Mandala Doily Die

Pill Bottle Die

Get Well Soon Die

~ Misc. Supplies Needed ~
Pencil
Glue Pen
Scoring Board
Scor-tape 1/2"
Red Rhinestone
Pink Rhinestones
Low-tack Tape
Double-stick Tape
White Cardsotck
Dimensional Foam Tape
White Gelly Roll Pen #10

**I participate in La-La Land Craft's affiliate program.  That means I receive a commission when products are purchased through links here on my blog. (At NO additional cost to you).  This allows me to be able to make more projects to share and hopefully inspire you!  From the bottom of my heart, I appreciate your support!!!

Happy Stamping!

~ Nicolette ~


Saturday, May 16, 2020

~ home SWEET home - La-La Land Crafts ~

Hello!

I'm back again to share my second project using La-La Land Craft's New May 2020 Mini Release.  Today I am featuring the new "Windows And Things Clear Stamp Set" and the coordinating "Hello There Clear Stamp Set."


This card features so many things that I love.  I love the color yellow, polka dots, flowers, bricks, boxwood wreaths and pie.  Boy, do I LOVE pie!  I love all kinds of pie...cherry, berry, lemon meringue, banana cream, chocolate cream, apple, pumpkin, pecan and the list goes on.  In my book, you can never go wrong with pie!  Yummmmm... 

~ WHAT'S IN THE NEW MAY MINI RELEASE ~

NEW CLEAR STAMPS!


Cured Yet? Clear Stamp Set
Windows And Things Clear Stamp Set
Hello There Clear Stamp Set

PLUS a NEW PRODUCT - Masking Vinyl to be used with "Windows And Things" and "Hello There" Clear Stamp Sets - So cool...definitely a must have!

NEW RUBBER STAMPS!


Here For You Rubber Stamp Set
Courage Marci Rubber Stamp
Doctor Marci Rubber Stamp
Doctor Luka Rubber Stamp
Nurse Marci In Scrubs Rubber Stamp
Nurse Luka Rubber Stamp

NEW CUTTING DIES!


Stitched Fight Die
Awareness Ribbon Die 
Get Well Soon Die
Heart Beat Die
Hope Heart Die Set
Pill Bottle Die Set


To create this scene, I used the "Tall Door Die" in one of my favorite colors...yellow.  I diecut and colored lots of bricks using the fireplace die from the "Fireplace Die Set."  Using the "Windows And Things Clear Stamp Set," I stamped, colored and cut out the center of the window frame so that I could add the designer polka dot paper from the "Hello Baby Paper Pack" for wall paper and add the curtains and pie.  I stamped and colored the kitty, stamped and trimmed down the sentiment, both are from the "Hello There Clear Stamp Set." 


I absolutely love boxwood especially when used in a wreath.  I created my version of a boxwood wreath by diecutting lots of leaves using the leaf die from the "Spring Window Die Set" and the second smallest circle die from the "Stitched Nested Circles Die Set."  After diecutting and coloring around sixteen sets of leaves, I trimmed off the leaves that would be on the inside of the wreath and set them aside.I carefully and lovingly glued them in place on the circle die cut.  Once done, I was able to glue in the extra leaves to complete the wreath.  I am totally in LOVE with how it turned out!!!

To create the porch light, I colored and cut off the star diecut from the "Stockings Banner Die" and added a yellow rhinestone for the light.


 I used the swirl from the "Under The Sea Die Set" as the waft of aroma coming from the pie.  I trimmed down the napkin diecut from the "Spoon And Napkin Die Set" to create a doily for the pie to sit on while it cools out on the window sill.


The "Spring Tree Die" is the perfect perch for this adorable kitty to hide so he can keep his eye on the cooling pie.  I'm pretty sure he has his sights set on having some pie for dessert...lol


To complete my picturesque home, I added green grass and a bunch of beautiful yellow flowers using the "Mushroom And Grass Border Die" and "Flower Bunch Die."

Sigh, this definitely looks like a home I would love to live in!

~ La-La Land Crafts ~

*NEW Windows And Things Clear Stamp Set
Windows and Things Stamp Set

Hello There Stamp Set

Tall Door Die

~ Copics ~
Bricks - W4, W0
Yellows - YR23 Y19 Y18 Y15 Y11
Greens - YG17, YG25, YG03, YG01, YG21
Pie - E35 E33 E31 E30/W5 W3 W1 W0 W00
Kitty - W5 W3 W1 W0 W00/R01 R00 R000
Window Frame/Porch Light - W5 W3 W1 W0 W00/Y11

~ Misc. ~
Silver Enamel Dot
Yellow Rhinestone
Silver Rhinestones
White Gelly Roll Pen #10
Catherine Pooler Twilight Ink Pad

**I participate in La-La Land Craft's affiliate program.  That means I receive a commission when products are purchased through links here on my blog. (At NO additional cost to you).  This allows me to be able to make more projects to share and hopefully inspire you!  From the bottom of my heart, I appreciate your support!!!

Happy Stamping!

~ Nicolette ~

Related Posts Plugin for WordPress, Blogger...