Friday, April 12, 2019

~Introducing La-La Land Craft's April 2019 Showcase ~


Happy Friday Everyone!

We at Team Friday welcome you to La-La Land Craft's new April 2019 Showcase.  This month's release is all about personal mantras and living inspired.  Your mind is a powerful thing.  When you fill it with positive thoughts, your life will start to change.


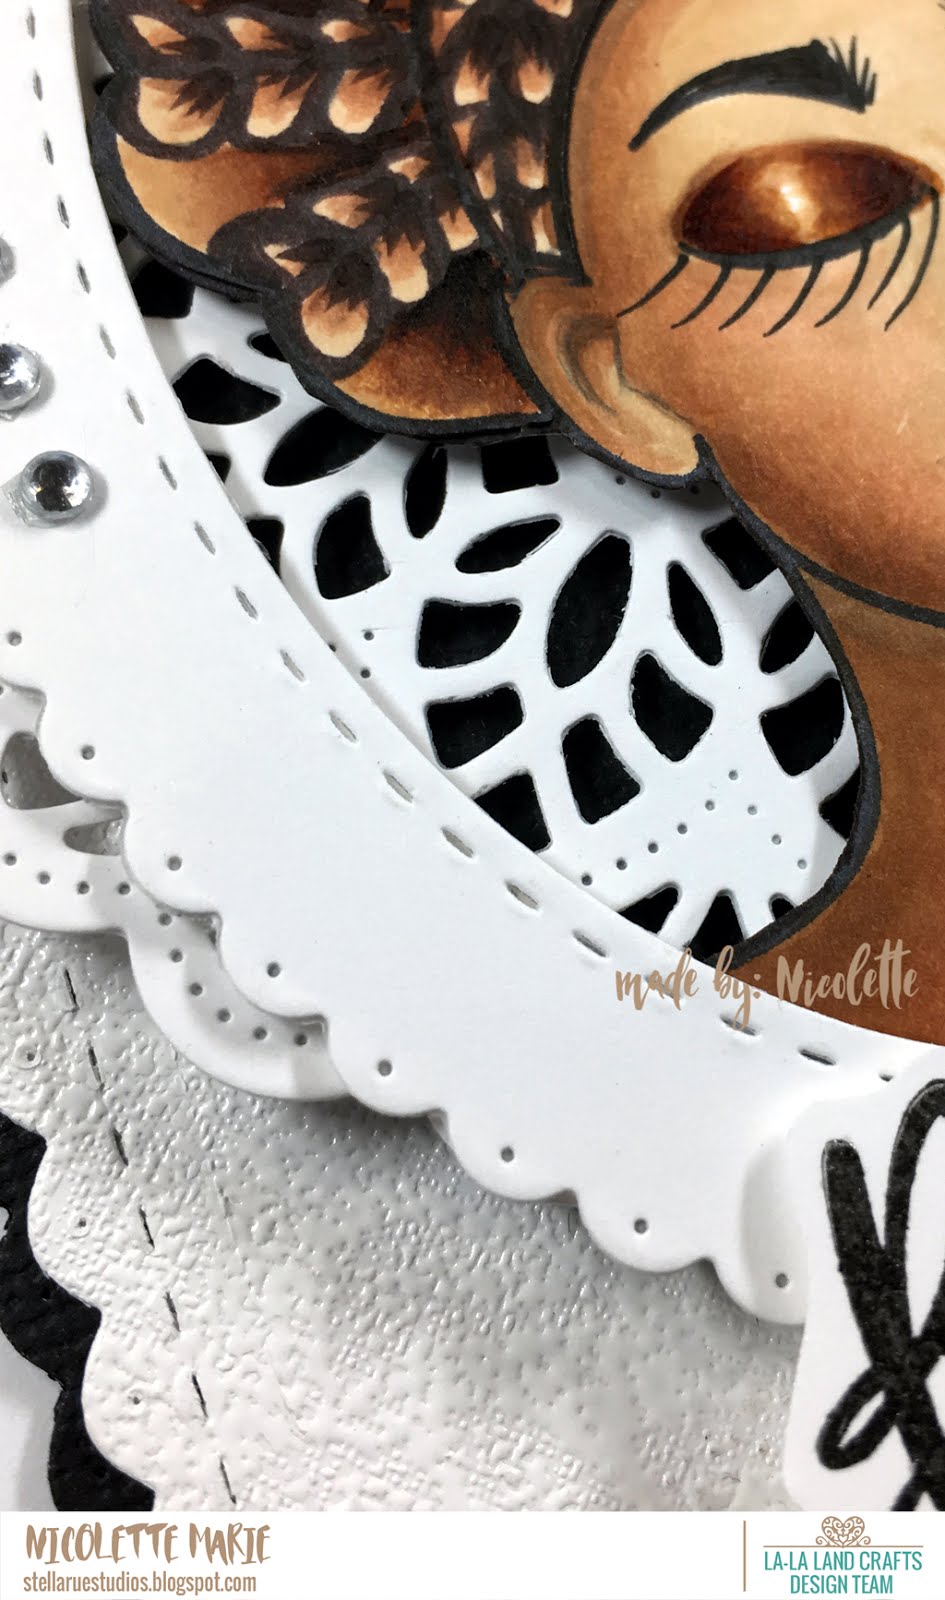
This stamp from the new Good Vibes Clear Stamp Set happens to be my favorite stamp from this release.  This image was pure joy to color and I think she turned out gorgeous!  Doesn't she look dreamy?!


When you emboss the new background from the You Inspire Me Background Stamp Set, you get an awesome look with lots of texture.

~ Copics ~
Skin:  E31 E33 E35 E23 E93 E04 E09
Hair:  E31 E33 E23 E35 E57 E79
Cast Shadow:  BV20
Multiliner:  0.3

~ Misc. ~
Silver Rhinestones
Stampendous Clear Embossing Powder
WOW! Opaque Bright White Embossing Powder

**I participate in La-La Land Craft's affiliate program.  That means I receive a commission when products are purchased through links here on my blog. (At NO additional cost to you).  This allows me to be able to make more projects to share and hopefully inspire you!  From the bottom of my heart, I appreciate your support!!!

Happy Stamping!

~ Nicolette ~

Wednesday, April 10, 2019

~ Whimsy Stamps - Panda Bad ~

Hi Friends!

Today I am sharing a card I made using the new Panda Butt Clear Stamp Set just released by Whimsy Stamps.  This stamp set was a past Paper Door Kit and it sold out so fast I never had the chance to share this funny apology card I made.  Unfortunately, we need to say "oops, I'm sorry" from time to time and I am sure all will be forgiven if you say I'm sorry with a card as silly as this. 


Somebody needs to bring a panda "poo" bag with them...lol

If you are not familiar with Whimsy Stamps Paper Door Kits, you are missing out for sure!  Whimsy's Paper Door Kit is a NON-subscription based kit.  How awesome is that!  Plus, you get to see all the goodies before ordering it....that's even more awesome!  April's kit is debuting today, and it is not only stinkin' adorable but hilarious!  This month's kit has a retail price of $50.00+ but you only pay $29.95 plus shipping.  That's an incredible value!  Trust me, you will want to order this adorable kit as soon as possible.  It is sure to sell out fast!  You can find all the details about April's Kit HERE

~ Whimsy Stamps ~

*NEW Panda Butt Clear Stamp Set
*NEW Panda Butt Clear Stamps

*NEW Panda Butt Die Set
*NEW Panda Butt Die Set

Basic Stitched Ovals Die Set

~ Copics ~
C1 C3 C5 C10
0 Blender

~ Misc. ~
Sequins
Mini Black Pom Poms
Vine Leaf Background Embossing Folder

**I participate in Whimsy Stamp's affiliate program.  That means I receive a commission when products are purchased through links here on my blog. (At NO additional cost to you).  This allows me to be able to make more projects to share and hopefully inspire you!  From the bottom of my heart, I appreciate your support!!!

Happy Stamping!


Friday, April 5, 2019

~ La-La Land Crafts - Hello Spring ~


Happy Friday Everyone!

Today's Team Friday challenge is spring.  I thought this sweet little baby bird waving from La-La Land Craft's "From The Herd Clear Stamp Set" was the perfect symbol of spring.


~ Step by Step ~
- Stamp and color birdie.  Trim around image.
- Die cut Spring Tree out of white cardstock and color.
- Die cut 3 or 4 Twigs out of white cardstock and color.  Cut twigs in half and build a nest.  I used a glue pen to adhere twigs together.
- Die cut "Hello" twice out of white cardstock.  Color one "Hello" and add sparkle before adhering to the other "Hello." (I used Spectrum Noir's Clear Sparkle Brush Pen).  Adhere them offset from each other using a glue pen. 
- Cut white cardstock at 4 1/4" x 11" and score at 5 1/2" to create card base.
- Die cut four pieces of white cardstock using the largest scalloped rectangle die from the Scalloped Rectangles Die Set
- Stamp one of the scalloped rectangles with the checkered background from the Just For You Background Stamp Set using Squeezed Lemonade Distress Ink. 
- Trim the scallops off one of the rectangles leaving the stitching.  Using the second largest circle die from the Double Stitched Circles Die Set, die cut a circle out of this piece.  Emboss this piece using a stencil from the Magical Sparkles Layering Stencil Set.  Adhere this piece to the checkered background piece using foam tape.
- Trim off the scalloped edges from the other two scalloped rectangles past the stitching.  Adhere these scalloped edges on the back of the checkered piece staggering them.
- Die cut the Filigree Border Die out of white cardstock.  Adhere to the above piece.
- You can now adhere this to your card base using foam tape in the center but adhesive to the sides of the scallops.  
-Adhere tree to card using foam tape.
- Cut slits along the sides of the wings to slide birdie into nest and adhere together.  Adhere to card using foam tape.
- Adhere "Hello" to card using foam tape.
- Add rhinestones.


The nest was so much fun to create using the Twigs Die.  Doesn't the baby bird looks so adorable sitting in his nest?!   I really love how it looks like the sun is shining through the leaves of the tree!


Adding sparkle to the "Hello" really makes it stand out!

I hope you enjoyed my tutorial and it inspires you to create a card with all your La-La Land goodies!!!

~ La-La Land Crafts ~

~ Copics ~
Bird:  B21 B23 B26
Beak:  Y18Y35 Y38 YR09
Leaves:  YG03 YG17 YG67
Tree Trunk & Nest:  E34 E35 E57 E79
Hello:  Y02 Y06 Y08

~ Misc. ~
Silver Rhinestones
White Gelly Roll Pen #10
Distress Ink:  Squeezed Lemonade
Spectrum Noir's Clear Sparkle Brush Pen


**I participate in La-La Land Craft's affiliate program.  That means I receive a commission when products are purchased through links here on my blog. (At NO additional cost to you).  This allows me to be able to make more projects to share and hopefully inspire you!  From the bottom of my heart, I appreciate your support!!!

Happy Stamping!

~ Nicolette ~


Tuesday, April 2, 2019

~ Second Look at Club La-La Land Craft's 2019 March Kit ~


Hi Friends!

I'm back again to share a few more projects that I have made using Club La-La Land Craft's 2019 March Kit.  This kit has been a pure joy to create with!  So much so, I created a third project to share with you today.  If you missed my original post showcasing this kit, you can see my projects HERE.

This is what was included in the March 2019 Product Kit.  So ADORABLE...right?!!!  Enrollment for this kit has closed, but don't you fret.  If you enroll now for the April kit, you can purchase past kits (if available) starting with your second month of club subscription....how cool is that?!  You can find all the details about Club La-La Land Crafts HERE.


Now let me show you what I have created to share with you today.  First up is this adorable hamster trying to juggle all the delicious cupcakes he has made.  This little guy is the stamp where he has a spoon in his hand and is sitting next to a plate of cake.  Every time I looked at him, I couldn't get this scenario out of my head, so off to the crafting table I went to create this scene.  He is laying on top of a bed of strawberry leaves on a cake stand...he has been a very naughty hamster eating all the strawberries but luckily he left a few to add to the cupcakes.  I created the cake stand using the mixing bowl die and several layers of the small icing layer from the Build-a-Cake Die.  I wanted it to look like a frilly cake stand.  


How cute is this Electric Mixer Die?!  I turned the cupcake top die upside down to make it look like cupcake batter in the mixing bowl.  I just love how this turned out!  This looks so yummy it makes me want to lick the bowl...lol


I added Nuvo Morning Dew Crystal Drops to the strawberries to give them that wet glistening look.  They look so real...I want to eat one!


To make the cupcakes look even more delicious, I added Liquid Pearls for icing....Yummmmm!


~ Copics ~
Hamster:  W00 W0 W1 W3 W5 R0000 R000 R00
Cupcake:  E55 E57 E59 E79
Cupcake Wrapper:  Y21 Y23 YR23 Y26
Strawberry:  R24 R27 R29 YG03 YG17 YG67
"Cake Stand" C00 C0 C1 C3 C5
Mixer:  R81 R83 R85
Multiliner:  0.03

~ Misc. ~
White Gelly Roll Pen #10
Liquid Pearls:  Petal Pink
Liquid Pearls:  Rouge
Nuvo:  Morning Dew Crystal Drops
Silver Rhinestones

For my second card, I decided to create an elegant card using the Build-a-Cake Die and make a three-tiered strawberry shortcake.  I seriously couldn't be any happier on how this turned out!  To create this cake stand, I turned the cupcake wrapper upside down and put it on top of the mixing bowl to get a totally different cupcake stand look.


I used the So Many Dots Layering Stencil for added dimension on the cardstock layers.  This card would definitely make a beautiful birthday card for someone special!


I seriously cannot get over how delicious and realistic this cake turned out!  I used Nuvo Simply White Crystal Drops for the icing and added the strawberries in while it was still wet to get that strawberry glaze effect in the icing...Swoon...I'm so in love with this creation!

~ Additional La-La Land Craft's Products ~
So Many Dots Layering Stencils
Scalloped Rectangles Die Set
Long Flags Die Set

~ Copics ~
Cake:  Y11 Y13 Y15  Y19 YR24
Strawberries:  R24 R27 R29 R89
Leaves:  YG03 YG17 YG67
Cake Stand:  C00 C0 C1 C3 C5
Multiliner:  0.03

~ Misc. ~
Silver Rhinestones
Nuvo:  Simply White Crystal Drops

I was having so much fun that I decided to whip up this adorable gift tag.  This cutie patootie hamster has my heart for sure!  This hamster is the stamp where he is holding a cupcake but my little guy decided he was wayyyyy to hungry and needed a big piece of cake to eat instead!  Apparently, he thought the three-tiered strawberry shortcake I created looked delicious, too!  I colored up the cake on the plate and added it to my hamster by cutting up his tummy (the cake hides the cut marks) and around his little paws so he could hold his piece of cake while eating it.  Have you ever watched a hamster eat?  So stinkin' adorable!!!


I even cut out little bite marks where he had already started to nibble...lol  He is a very happy hamster!


~ Additional La-La Land Craft's Products ~
Just For You Background Stamp Set
So Many Dots Layering Stencil Set
Pierced Scalloped Circle Die Set
Stitched Nested Circles Die Set
Large Stitched Tags Die Set

~ Copics ~
Hamster:  W00 W0 W1 W3 R20
Cake:  Y11 Y13 Y15 Y19 YR24
Strawberries:  R24 R27 R29 R89
Leaves:  YG03 YG17 YG67
Multiliner:  0.03

~ Misc. ~
Ribbon
Silver Rhinestones
Memento:  Dandelion Ink Pad
Nuvo:  Simply White Crystal Drops
Nuvo:  Morning Dew Crystal Drops

I know you don't want to miss out on any further cuteness...join Club La-La Land Crafts today!
  You can find all the details about Club La-La Land and enroll HERE.

**I participate in La-La Land Craft's affiliate program.  That means I receive a commission when products are purchased through links here on my blog. (At NO additional cost to you).  This allows me to be able to make more projects to share and hopefully inspire you!  From the bottom of my heart, I appreciate your support!!!

Happy Stamping!

~ Nicolette ~

Monday, April 1, 2019

~ Introducing Whimsy Stamps April 2019 New Release ~

Happy April Everyone!

It may be April Fool's Day but it's no trick that the waiting is finally over and the Panda Butt Clear Stamp Set and coordinating die set from the past August 2018 Paper Door Kit from Whimsy Stamps is now available for everyone to purchase.  Woo Hoo!  The Panda Butt kit was my absolute favorite kit of all time...I am very partial to pandas!  What's not to love?!  I just love how these cutie patootie pandas are working together to gather bamboo for a light panda snack...lol


These pandas are so fast and easy to color and having the matching die set makes it a breeze to cut them out and put a card together.  This card would definitely cheer anyone up!  


~ Copics ~
 C1 C3 C5  C10
Blender 0

~ Misc. ~
Glitter Paper
Vine Background Embossing Folder

**I participate in Whimsy Stamp's affiliate program.  That means I receive a commission when products are purchased through links here on my blog. (At NO additional cost to you).  This allows me to be able to make more projects to share and hopefully inspire you!  From the bottom of my heart, I appreciate your support!!!

Happy Stamping!

Friday, March 29, 2019

~ La-La Land Craft's - Spa Day ~


Happy Friday Everyone!

Today's challenge for Team Friday is to use La-La Land Craft's new release.  I have chosen to make a shaker tag using these adorable chickies from the new Relax & Unwind Clear Stamp Set.  I love the towels wrapped around their heads.  I used Copic's Various Ink Colorless Blending Solution and an old piece of terry cloth to get that realistic look of a terrycloth towel.  I even used this technique on the bunny slippers to make them look fuzzy.


This tag would be perfect to add to a spa day gift basket for someone special or you could add a pocket on the back and stick a gift card in it.  La-La Land has the perfect Curved Pocket Die just for this occasion.


To make the sparkle nail polish, I added Spectrum Noir's Clear Sparkle Brush Pen after I colored the bottle with Copics.  I just love how sparkly and fun this shaker tag looks!


~ Copics ~
Chickies:  Y13 Y15 Y18 Y19 Y35
Beaks:  Y35 Y38 YR09
Pinks:  R81 R83 R85
Grays:  C00 C0 C1 C3
Cast Shadow:  BV20
Blending Solution/Terry Cloth

~ Misc. ~
Sequins
Pink Rhinestones
White Sparkle Tulle
White Gelly Roll Pen #10
Robins Nest Clear Dew Drops
Spectrum Noir Clear Sparkle Brush Pen

**I participate in La-La Land Craft's affiliate program.  That means I receive a commission when products are purchased through links here on my blog. (At NO additional cost to you).  This allows me to be able to make more projects to share and hopefully inspire you!  From the bottom of my heart, I appreciate your support!!!

Happy Stamping!

~ Nicolette ~

Wednesday, March 27, 2019

~ Whimsy Stamps - Build-a-Basket ~

Whimsy Stamp's new spring release is so much fun!  I just adore this Build-a-Basket Die Set!  My mom used to build me the most amazing Easter baskets when I was little.  She would display them on an adorably decorated table along with other special Easter goodies.  I carried this tradition on with my girls and now my grandson.  When I saw this die, I just knew I had to build my own basket in honor of my special Easter memories.  I think the mini carrot is my favorite die in this set, tho.  I had so much fun coloring up these little cuties that I decided to place them around the oval frame and I just love how stinkin' cute they look!


Just look at the beautiful shimmer and shine on the Easter eggs from the WOW! Embossing Powders.  The glittery embossing powders are somewhat translucent, so I colored a few of the eggs first with my Copics before adding the embossing glitters.  I loved the fact that I was able to get a variety of different looks using the same powders.  For the chocolate rabbit and the basket, I used Stamendous's Clear Bark Embossing Powder.  I also colored the rabbit first with my Copics before adding the embossing powder.  This gave the rabbit that rich yummy chocolate look.


Whimsy's Sprinkles Stencil is so fun.  On this card, the sprinkles look like mini carrots....soooooo cute!

~ Whimsy Stamps ~


~ Copics ~
Chocolate Bunny:  E57 E59
Pink Eggs:  R81 R83 R85
Teal Eggs:  BG10 BG11 BG13
Carrot:  YR04 YR07 YR09 R08
Carrot Greens:  YG03 YG17 YG67

~ Misc. ~
Rhinestones
VersaMark Watermark Ink Pad
Stampendous:  Clear Bark Embossing Powder

WOW! Metalline First Frost Embossing Powder

WOW! Under The Sea Embossing Powder

WOW! Taffeta Pink Embossing Powder


**I participate in Whimsy Stamp's affiliate program.  That means I receive a commission when products are purchased through links here on my blog. (At NO additional cost to you).  This allows me to be able to make more projects to share and hopefully inspire you!  From the bottom of my heart, I appreciate your support!!!

Happy Stamping!

Related Posts Plugin for WordPress, Blogger...